.png)
Recording oral histories is a meaningful way to preserve personal stories and memories. This guide explains how to plan, record, and archive oral histories effectively. Here's a quick summary:
- Purpose: Define your goals, like creating a family archive or documenting an event.
- Participants: Choose narrators with firsthand experiences and prepare an empathetic interviewer.
- Questions: Use open-ended prompts, starting with biographical details and moving to deeper topics.
- Equipment: Use reliable audio recorders or platforms like Storii for easy recordings and transcription.
- Environment: Minimize background noise and test equipment before starting.
- Conducting Interviews: Build trust, listen actively, and manage time carefully.
- Preservation: Back up recordings using the 3-2-1 rule and transcribe for accessibility.
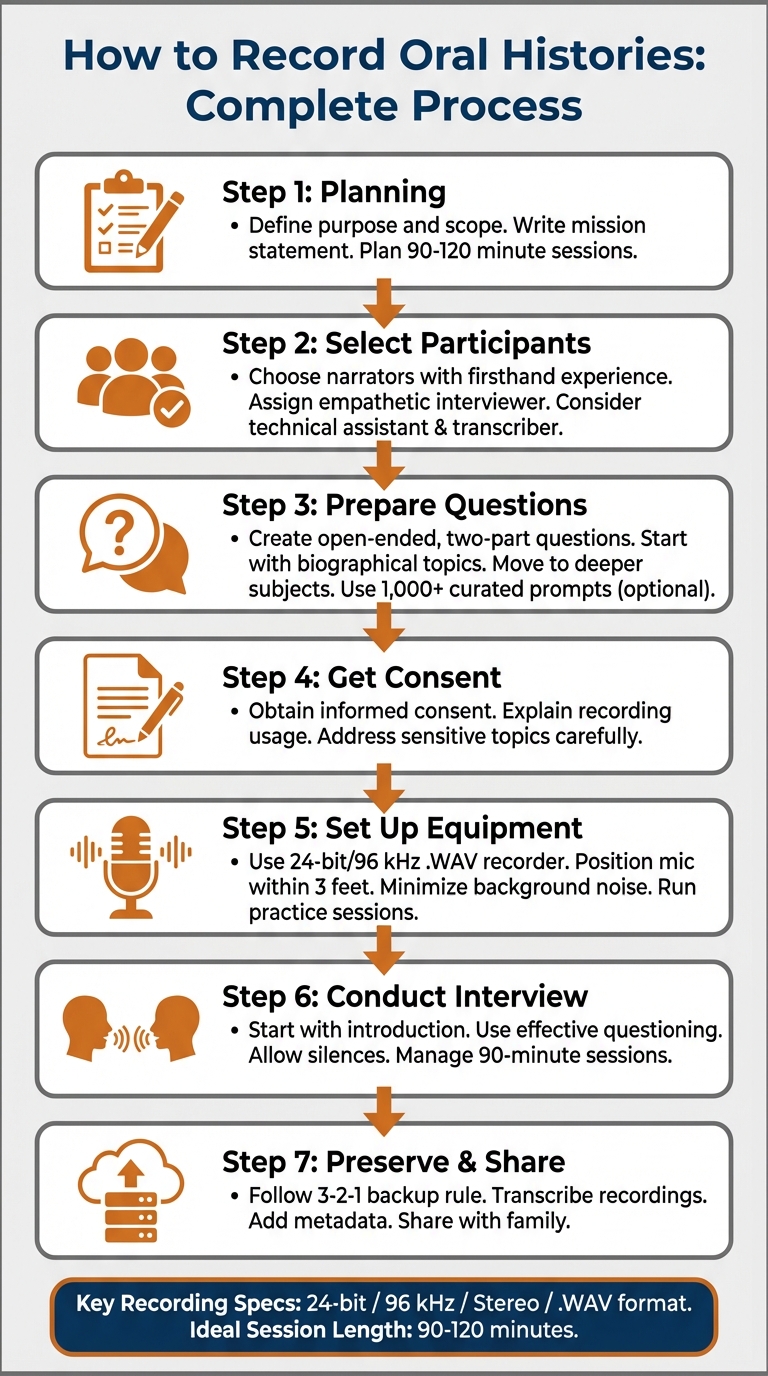
7-Step Oral History Recording Process: From Planning to Preservation
Best Practices & Tools for Oral History Recording - Tutorial
Planning Your Oral History Project
Good planning is the backbone of any successful oral history project. It helps you stay focused, ask meaningful questions, and gather stories that truly capture the essence of your subject.
Define Your Purpose and Scope
Start by figuring out what you want to achieve. Are you creating a family archive, writing a research paper, or documenting a specific experience, like military service? As the University of Pittsburgh Library System points out, "having a clear goal will help drive the participants in the project and direct the line of questioning."
Write a short mission statement that outlines your project's purpose, the people you plan to interview, and how you’ll use the material. Keep interview sessions manageable - 90 to 120 minutes is ideal to avoid tiring both you and your narrator.
Once your goals are clear, think about who can best bring these stories to life.
Select the Narrator and Assign Roles
Choose narrators who have firsthand experience with the events or themes you’re exploring. The Oral History Association suggests prioritizing individuals whose voices are directly tied to the story you’re documenting, while also ensuring a range of perspectives. Firsthand accounts are far more valuable than secondhand retellings.
The interviewer plays a key role. This person should be empathetic, a good listener, and skilled at guiding conversations without taking over. For larger projects, you might need a team: a technical assistant to handle equipment and a transcriber to turn audio into text. As the Smithsonian Institution Archives explains, "the well-prepared interviewer will know what information is already in documents and will use the oral history interview to seek new information, clarification, or new interpretation of a historical event."
Create a Question Outline
Craft your questions to encourage detailed, meaningful responses. Open-ended, two-part questions often work best - set the scene first, then ask the question. Start with easy, biographical topics (like a person’s birthplace or family background) before moving into deeper or more complex areas.
For example: "Moving can be stressful for a family. How did you feel when you left your childhood home?"
If you’re stuck on where to begin, resources like Storii offer over 1,000 curated prompts to help families create personalized questions. These prompts can even be customized and arranged through an online portal.
Once your questions are ready, make sure to handle consent and sensitive topics thoughtfully.
Address Consent and Sensitivity
Before you hit record, get informed consent from your narrators. Explain how the recordings will be used and reassure them that they can skip questions or pause the interview whenever they want. Save sensitive topics for later in the conversation, once trust has been built. Also, be aware of how factors like age, gender, race, or ethnicity might shape the interview dynamic. Approach every conversation with empathy and cultural awareness.
Preparing for the Recording Session
Getting ready for a recording session means ensuring your equipment is set up correctly and that your space is optimized for clear audio and comfort.
Choose Your Recording Equipment
Your choice of equipment will depend on your budget and how comfortable you are with technology. For high-quality recordings, go for a digital audio recorder that supports 24-bit/96 kHz uncompressed .WAV files. A good option is the Tascam DR-40, which costs under $200 [13, 14].
Pair your recorder with an external condenser microphone featuring balanced 3-pin XLR connections for better sound quality. Wired lavalier microphones, like those from Audio-Technica (also under $200), are excellent for this purpose.
If you're working with participants who aren’t tech-savvy or conducting remote interviews, consider a service like Storii. It offers automated phone recordings and transcription for $119 per year, allowing up to three 10-minute calls per week. Storii has a 4.8-star user rating, making it a reliable choice.
"The equipment you choose is only as good as your ability to use it to best advantage. And the best way to learn the possibilities and nuances of a recorder and microphone is to practice with them." – National Park Service
Set Up the Recording Environment
Choose a room with carpeting and soft furnishings to absorb sound and reduce echoes. Place the microphone no more than three feet from the narrator, ensuring it’s aligned with their voice for the best clarity.
To minimize background noise, turn off anything that hums, ticks, or creates sound - like televisions, radios, refrigerators, and air conditioners. Close windows and doors, and set cell phones to silent (not vibrate, as it can cause buzzing). Use stationary chairs instead of wheeled ones to avoid squeaks or movement noise [14, 15]. Keep water and tissues handy for coughs or emotional moments, and use a mic stand instead of holding the microphone to eliminate handling noise.
Once your space is ready, run a quick test to ensure everything works as planned.
Run Practice Sessions
Testing your setup is a must before the actual interview. As the Smithsonian Institution Archives puts it:
"Practice until you master its nuances." – Smithsonian Institution Archives
Start with a trial recording on a casual topic to save your narrator’s best stories for the real session. During the test, set recording levels between -6 dB and 0 dB to avoid distortion. Ensure both you and your narrator speak during the trial to confirm all voices are being captured clearly. Use headphones to monitor the recording in real time, which helps you catch issues like audio dropouts, squeaky chairs, or distant humming sounds that might otherwise go unnoticed [13, 14].
Practice sessions aren’t just about testing equipment - they also help build familiarity and comfort between you and the narrator. This can make the actual interview feel more like a natural conversation rather than a formal Q&A [5, 12]. Plus, these trial runs give everyone involved a confidence boost before the big day.
sbb-itb-ce27d7a
Conducting the Oral History Interview
The success of an oral history interview often hinges on creating a comfortable and trusting environment for your narrator. A relaxed atmosphere encourages them to share meaningful stories and insights.
Start with an Introduction
To set the stage, arrive early and engage in casual conversation while setting up your equipment. This informal interaction helps put your narrator at ease before the recording begins.
Once you're ready, explain the purpose of the project, how the recording will be used, and the narrator's rights. Make it clear that they can skip any question or request to pause the recording at any time. This transparency fosters trust and gives them a sense of control over the process.
Begin each recording with a formal introduction. Include your name, the narrator’s name, the date, the location (described generally, like "the narrator’s home", to protect privacy), and the project name. Obtain verbal consent to record and agree on a session length - typically 90 minutes to 2 hours - to set clear expectations.
Start with simple biographical questions like, "When and where were you born?" These straightforward prompts help your narrator settle into the conversation.
"Good interviewing is about temperament as well as technique. Important attributes of an interviewer are empathy, eagerness to learn, and the capacity for respectful listening. Good interviews emerge from trust and respect." – National Park Service
From there, guide the conversation toward more in-depth storytelling with thoughtful questions.
Use Effective Questioning Techniques
The key to a rich interview lies in asking open-ended questions that encourage detailed responses. Phrases like "Tell me about..." or "Describe..." invite your narrator to share their experiences in depth. Follow up with questions that explore "how" and "why" to gain further insights.
Active listening is crucial. Avoid interrupting, and allow moments of silence - these pauses give your narrator time to reflect and elaborate. Use non-verbal cues like nodding or smiling to show you’re engaged, but avoid verbal affirmations that could interfere with the recording.
If the narrator uses technical terms or unfamiliar jargon, ask for clarification to ensure the story remains accessible. Visual aids like photographs, maps, or artifacts can also help jog their memory and enrich the conversation.
While a prepared question outline is helpful, don’t hesitate to follow unexpected tangents. Some of the best stories emerge when the narrator feels free to explore topics in their own way. Strike a balance between sticking to your project’s goals and letting the narrator highlight what they find most meaningful.
Manage Time and Emotions
Keep sessions to around 90 minutes, with a maximum of 2 hours, to prevent fatigue. Begin with lighter, easy questions to build trust before addressing more sensitive topics. Pay attention to the narrator’s tone, expressions, and body language to gauge their comfort level. If they seem tired or distressed, offer a break or wrap up the session.
Allow silences - they often lead to deeper, more thoughtful responses. If the conversation veers off-topic, gently guide it back without dismissing the narrator’s input. Should time run out and the narrator has more to share, consider scheduling another session rather than rushing through important details.
"The experienced interviewer maintains rapport by... challenging questionable information in a non-threatening way, and generally maintaining an atmosphere in which the interviewee feels able to respond fully and truthfully." – Martha Ross, Smithsonian Institution Archives
Conclude the Interview
Wrap up by asking reflective, summarizing questions that help the narrator process the experience. Encourage them to share any additional thoughts or address anything they feel was overlooked. These closing moments often provide unexpected insights.
End the session by expressing gratitude and outlining next steps, such as when they can expect a copy of the recording or transcript. Afterward, jot down field notes about the session’s dynamics and the narrator’s emotional state - these details will be invaluable during transcription and analysis.
Saving and Preserving Recordings
After wrapping up a successful interview, it’s crucial to secure your recordings to protect these irreplaceable memories. The Oral History Association offers a straightforward guideline: "Lots of Copies Keep Stuff Safe" (LOCKSS). In other words, make multiple identical copies and store them in separate locations.
Back Up Your Files
Stick to the 3-2-1 rule: create 3 copies of each file, store them on 2 different types of storage media (like an external hard drive and cloud storage), and keep 1 set of copies in an offsite location. As soon as possible, transfer your recordings to a secure computer or server. Use clear and consistent file names starting with the date in YYYY.MM.DD format, followed by the narrator’s name and a keyword. For instance: "2025.12.25_JohnSmith_Interview".
When saving audio, opt for 24-bit / 96 kHz / Stereo / .WAV format instead of compressed formats like MP3, which aren’t ideal for long-term preservation. To keep up with hardware wear and technological updates, copy files to new storage devices every five years. Make sure to document where your backups are stored, what they contain, and how they’re organized for easy reference later.
Once your recordings are securely backed up, focus on transcribing them to make them more accessible in the future.
Transcribe and Summarize Recordings
Transcripts give “intellectual access” to your recordings, making them searchable and practical for family members or researchers who might not have time to listen to hours of audio. Include notes about the session's tone and any technical issues to provide additional context for future use. To ensure accuracy, compile a list of all names and any specialized terms mentioned during the interview.
Storii can automatically transcribe recordings and generate downloadable memoirs in PDF format, saving you the effort of manual transcription. If you prefer to handle transcription yourself, start with a short introduction explaining why the narrator was chosen and the conditions of the interview. Add a one-paragraph summary and a list of a dozen or so keywords to help identify the recording later.
Organize and Preserve Files
Enhance your recordings with metadata (dates, names, locations, topics) so future users can easily understand the content. Include details like:
- Administrative information (acquisition date, project ID)
- Descriptive elements (narrator name, keywords)
- Technical specs (file size, format)
- Preservation notes (checksums, condition details)
- Rights information (copyright status, signed release forms)
"Every oral history project should have a plan for archiving its oral histories that aligns with the project's goals and works within the capacity of the project's partners." – Oral History Association
Store files in widely supported formats to avoid issues with outdated technology. Keep legal release forms, interview notes, project descriptions, and any photos taken during the session with the audio files. For optimal redundancy, combine cloud storage services like Google Drive or Dropbox with external hard drives - this ensures both accessibility and local control.
Once your files are well-organized, you can focus on sharing them with your intended audience.
Share and Collaborate with Family
To complete your oral history project, ensure that legal release forms are securely stored alongside your recordings. These forms should clarify copyright ownership and outline any restrictions on access or distribution. Since oral histories are co-created, copyright usually belongs to both the interviewer and the narrator unless an agreement specifies otherwise.
Storii makes sharing simple, allowing you to send stories securely via email, SMS, or private links. The platform manages access permissions, ensuring recordings remain protected while being easily shared with chosen recipients. If you’re sharing files independently, establish clear rules about who can access master files versus copies and define restrictions for any sensitive content. To add more depth, include supplementary materials like photographs, maps, or field notes along with the recordings.
Conclusion
Capturing oral histories doesn't have to be a complicated process. By planning, recording, and preserving these stories, you can create a lasting archive of family memories that will be cherished for generations.
Storii makes the process even easier by automating recording, transcription, and sharing, so you can focus on the stories themselves. With a library of over 1,000 question prompts, the platform saves you the hassle of crafting your own interview guide from scratch.
Cameron Graham, Co-founder and CEO of Storii, highlights the value of this:
"Being able to learn about specific moments in their lives in their own words will help you understand your traditions, heritage and what shapes your family".
Storii also transcribes recordings in under two minutes and allows you to schedule up to three calls per week, making it easier than ever to document your family's oral history .
FAQs
What should I consider when planning an oral history project?
When kicking off an oral history project, start by clearly defining its purpose and scope. Think about what you want to uncover, who you plan to interview, and how the recordings will be used or shared. Dive into existing materials to spot any gaps that personal stories could fill - this can help shape your interview topics. Don’t forget to factor in practical considerations like your budget, timeline, and available resources to ensure everything stays manageable.
Ethics should be front and center. Make sure to get informed consent, prepare release forms, and set clear policies for privacy and access. Identify narrators who can authentically contribute to the story you’re looking to tell. Pre-interviews are a great way to build rapport and gather essential biographical details before diving into the main conversation.
Craft an interview guide with flexible, open-ended questions, and choose reliable recording equipment that you’ve tested in advance. Once the recording is done, label files with key details like the date, time, and participant name. Back up your data in multiple locations to avoid losing valuable content, and consider transcribing the interviews to make them more accessible. Tools like Storii can make this process easier by offering high-quality audio recording via phone, automatic transcription, and secure file storage. By addressing these steps early on, you’ll set the foundation for a meaningful and well-organized oral history project.
How can I make sure my oral history recordings sound clear and professional?
To capture clear and professional audio for oral history recordings, start by selecting dependable equipment. A digital recorder or an external microphone paired with your smartphone will produce much better sound quality than the built-in microphones most devices come with. Always test your setup beforehand to confirm that the audio levels are clear and free from distortion.
Choose a quiet, non-echoing space for your recording. A small, carpeted room works well. Reduce background noise by turning off fans, silencing phones, and closing windows. Position the microphone 6–12 inches from the speaker’s mouth, slightly off to the side, to avoid harsh sounds like pops or hisses. If you have access to one, a pop filter can further improve the sound.
For recording, use an uncompressed format such as WAV at 44.1 kHz/16-bit or higher. These settings help maintain high-quality audio for editing and long-term storage. Once the session is complete, back up your files immediately - store them on a secure computer and an external drive to ensure they’re safe from data loss. For a more streamlined, phone-based option, Storii provides automated recording, transcription, and secure cloud storage, making it simple to preserve life stories with minimal effort.
What’s the best way to preserve and share oral history recordings?
To ensure oral history recordings are preserved, start by creating high-quality digital audio files. Be sure to include essential details like the date, location, the interviewee's name, and consent information as metadata. Store the recordings in at least two secure places - such as a reliable cloud service and an external hard drive. It's also a good idea to create a lossless master copy for archival purposes, along with a more practical version for everyday use.
Transcribing the recordings is another important step. Transcriptions make the content easier to access and serve as a backup in case the audio quality deteriorates over time. When you're ready to share these recordings, use a secure platform that ensures privacy and ease of access. Tools like Storii can simplify this process by enabling phone-based recordings, offering transcription services, and even allowing you to download stories as audiobooks or PDFs. This way, cherished memories can be preserved and shared safely for future generations.
Related Blog Posts
Storii Gift Box
Best for special occasions such as Mothers Day, Fathers Day, Birthdays and the Holidays.

